Retro Baby Dots Blanket
- Jul 6, 2016
- 4 min read
Updated: Jan 25, 2019
Intermediate ✦✦✧✧✧

Here is a free crochet pattern for a retro 70s inspired baby blanket. The colors are modern but the pattern is a bit groovy.
I have some great news! I am pregnant with my first child!
Since I now have an excuse to make all the baby things, you will find a few new patterns for baby-related projects. Of course, one of the first things I had to tackle was the perfect baby blanket. So, I set out to make a simple rainbow-inspired pattern that would look elegant for either a boy or a girl.

For this blanket, I splurged on yarn. I used Knit Pick's Might Stitch (80% acrylic, 20% superwash wool) with a 6mm hook.
Specifically, I bought their Soft Rainbow Sampler and used all of the colors, except the pink and lavender, with navy for the border. This yarn is one of the softest acrylic yarns I have ever felt. Definitely worth the purchase. I used about 1 skein each of 6 different colors, plus 1/4 skein of navy for the border.
This blanket is made of simple 4-inch squares that are attached using a single crochet join. The sc-join adds texture to one side of the blanket and gives it a sort of retro vibe that I like.
To decide the color combination of each square, I started by making 9 centers in each color, then added the next round once in every color combination possible. Unfortunately, some of the colors clashed slightly, so from those first 9 in each color, I picked the most pleasing combinations to make the rest of the 2nd round circles.
Then, I stuck with those pleasing color combinations for the third round, to avoid clashing, and repeated the center for the last squaring round. All in all, I am very pleased with the arrangement.
Once all of the squares were completed, I laid them out with the center/square colors aligned along the diagonal and tried to evenly space all of the colors so I didn't have too many of the same too close together. Of course, the final arrangement is entirely up to your personal preference. I just chose what looked good to me!


Left: Planning the color scheme for the first 2 rounds. Middle: All 54 squares complete.
Right: Laying out the squares in a pleasing arrangement.
Special stitches:HTC: half treble crochet. YO 2 times, pull a loop up in the indicated stitch, pull a loop through 2 loops on the hook, pull a loop through all 3 loops on the hook.
Even Inc: even increase. made over 2 stitches: sc in the 1st st, sc2tog in the 1st and 2nd st, sc in the 2nd stitch.
Square: (make 54)

Switch colors each round. Begin the first 3 rounds with ch 3 (counts as the first dc). Round 1: 14 dc in a magic ring. Round 2: 2 dc in each st around. (28 sts) Round 3: [dc, 2 dc in the next st] repeat 14 times. (42 sts) Round 4: ch, [sc 2, hdc, dc, (htc, tc) in next st, ch, (tc, htc) in next st, dc, hdc, sc, even inc, sc, hdc, dc, (htc, tc) in next st, ch, (tc, htc) in next st, dc, hdc, sc 2] twice. (50 sts around: two 13 st sides and two 12 st sides)
Single Crochet Join: In the color of the first corner square: pull up a loop in the corner ch of the first square and pull up a loop in the corner ch of the second square, pull a loop through all 3 loops on the hook. Pull a loop in the next st of the first square, pull a loop in the next st of the 2nd square, pull a loop through all 3 loops on the hook. Repeat across to the corner and in the corner ch of 1st and 2nd squares.

Align the next square (in the same center/square color as the 2nd square) to the other side of the 1st square. Pull up a loop in the corner ch of the first square and pull up a loop in the corner ch of the third square, pull a loop through all 3 loops on the hook. Pull a loop in the next st of the 1st square, pull a loop in the next st of the 3rd square, pull a loop through all 3 loops on the hook. Repeat across to the corner and in the corner ch of 1st and 3rd squares. Switch to the color of the 2nd square. Repeat the process for the next diagonal squares, all with the same center/square color. Each diagonal stripe will have one more square to join than the previous one, up to 6 squares. Then start working in diagonals of 6 squares until the long edge is 9 squares long, and begin closing the rectangle.


Left: Detail showing sc-join in the corner between rows. Middle: Sc-join for the first 3 diagonal rows. Right: Showing the texture of the join.
Edging:
Switch colors each round. Round 1: ch, sc in each st around, with [sc, ch, sc] in the corner chain stitch. Round 2: ch, sc in each st around, with [sc, ch, sc] in the corner chain stitch. (Fig. 8) Round 3: dc in each st around, [dc, ch, dc] in the corner ch for a rounded corner (Fig. 9), or [dc, tc, ch, tc, dc] in the corner ch for a sharp corner.


Left: Detail showing first 2 rounds of the border.
Right: Final round of the border with "rounded corners".

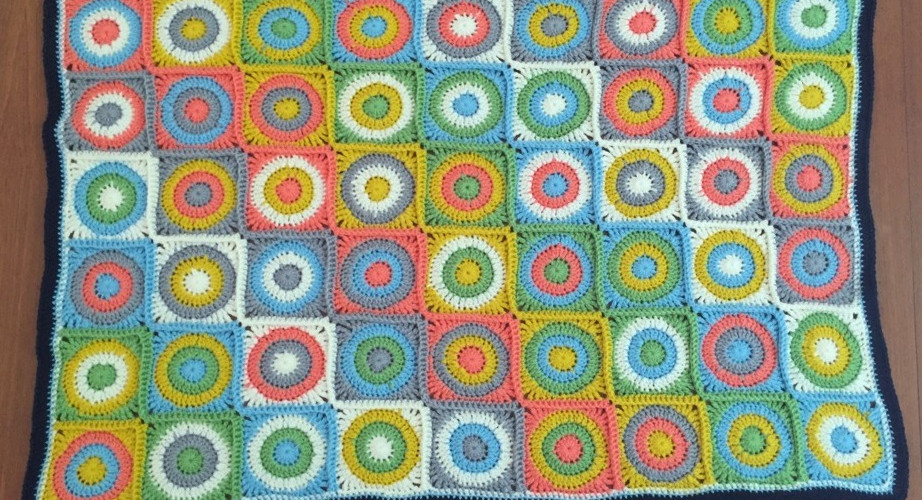


I love the textured front and smooth back of this blanket.
Textured for tummy time and smooth for cuddling and napping.

