Book of Kells - Square Knot
- Aug 1, 2014
- 7 min read
Difficulty: Advanced ✦✦✦✦✦

Celtic knots have always intrigued me. Ever since I made the open Celitc knot square, I have been mulling around with the idea of making a solid knot using something like cabling found in Knitting. With a little experimenting, I found a technique of using relief stitches (front-post dc, tc, and dtc) worked over rows of sc to create a similar look. In fact, I think it works better than knitted cables in capturing the essence of the Celtic knot
Update 3 March 2018:
If you are having trouble with this pattern, I highly recommend looking at my Celtic Heart Square. It is a much simpler celtic knot and the pattern includes not only a chart, but also written instructions and a video showing how to stitch the complex relief stitches.
For my inspiration, I went directly to source: the Book of Kells online from Trinity College Dublin. I found many gorgeous examples of intricately woven knots among the pages of the illuminated manuscript, and settled on a corner motif for my first Book of Kells pattern.


To begin, I traced the knot pattern in Inkscape to work out the details of the knot. I modified the corner square section to be a complete, closed, one-stranded loop rather than two that continue to the top and right motifs. From there, it was relatively easy (for me) to translate into crochet stitches.
Dimensions:
When the square is made with Vanna's Choice yarn and a 5 mm (H) hook, it measures 8 inches x 10 inches (which happens to be the perfect size for an iPad cozy).
This pattern consists of relief double, treble, and double-treble crochet stitches. These are made just like normal dc, tc, and dtc stitches, but are looped around the designated stitch in a row below rather than through the top of the stitch directly below. In most cases, the relief stitch is made 2 rows down and several stitches to the right or the left of the starting position.
Unfortunately, this is a very difficult pattern to give written directions for. I am providing this pattern as a chart only, but I will explain how to do some of the trickier steps.

This pattern begins with Chain 40.
Then proceed with the diagram at the Start arrow. The first 4 rows are sc across. At the end of each row, chain 1 to turn.
The first relief stitches begin on Row 5:
The pattern alternates rows of grey and blue single crochet (represented by a X). Each blue row is stitched on the "right side" (RS) of the project. Each grey row is stitched on the "wrong side" (WS) of the project. The relief stitches are made in the blue rows on the RS. Always stitch a sc for any X in the pattern, even if there is a relief stitch on top of it. Relief stitches are always made from in order right to left side of the diagram row. When looking at the diagram, the top of each stitch looks like a T. There is never a blue X beneath a T because this is the beginning of a relief stitch rather than a single crochet place holder. The number of hash marks through the stitch indicate the number of yarn overs (YOs) to make before looping around a stitch.
The open circle indicates where to loop around a stitch in a row below to create the relief stitch.
I tend to work with the project upside down when making these relief stitches. The 3 types of relief stitches:
Vertical post stitches are always treble crochets. YO twice, then insert the hook around the stitch 2 rows below (the next blue row) and pull up a loop. Then complete the stitch like a normal tc.
Diagonal cross stitches are always double treble crochets. YO 3 times, then insert the hook around the stitch 2 rows below and 3 stitches to the left or to the right depending on the direction of the cross, pull up a loop, and complete the stitch like a normal dtc.
Horizontal relief stitches are made like a double crochet but always in combination with a Vertical Post or Diagonal Cross relief stitch. After pulling a loop through the stitch at the bottom of the Vertical/Diagonal stitch, YO and insert the hook around the stitch 2 stitches to the right. This can be repeated for 1-5 stitches depending on which row of the pattern. Each open circle in the diagram represents a stitch that the horizontal relief stitch is fixed to with a loop. The last loop is almost always formed around another relief stitch to the right. After pulling a loop around the last stitch in the sequence, then YO and pull a loop through 2 loops at a time until there is only 1 loop left on the hook.
Let me explain a couple stitches in more detail with a diagram:
Here is a diagonal cross of dtc.
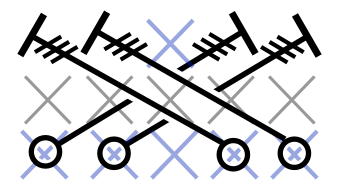


The first two rows of this example are all sc across. In the 3rd row, YO 3 times, count over 4 sts from the right and 2 rows down, insert the hook through that stitch and pull up a loop. Finish the dtc. Repeat this to make the second dtc through the st to the left of the one made (the 5th st from the right, 2 rows down). Skip 2 sts in the grey row (notice that there are no blue Xs behind the 2 dtc) and sc in the 3rd st. Now, YO 3 times, insert the hook through the st that is 3 sts to the right of the first relief-dtc made and pull up a loop. Finish the dtc like normal and repeat the st for the next dtc just to the left of the one just made. The sc in between the two pairs of relief-dtc is essential to anchor the relief sts and form the cross. This pattern is followed by another grey row of sc on the WS. Do not skip and sc into the top of the relief sts as those also give structure to the finished piece.
Here is a long horizontal relief stitch.
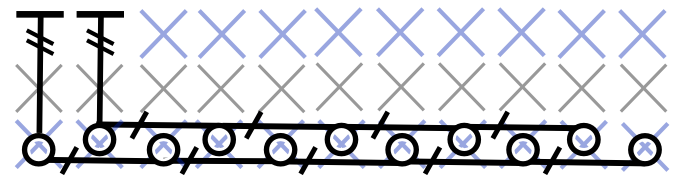


The first two rows here are also sc across. In the third row, after 9 sc, YO twice, insert the hook through the st 2 rows below and pull up a loop, (YO, insert the hook through the st 2 to the right and pull up a loop) 4 times. You should have 12 loops on your hook. Now, proceed like any other post stitch, pulling a loop through every 2 loops on the hook back to the start. Then, proceed with the second right angle horizontal relief stitch. YO twice, insert the hook through the st 2 rows below and pull up a loop, (YO, insert the hook through the st 2 to the right and pull up a loop) 5 times. Each st that you pull a loop up onto the hook to the right of the initial stitch should be a skipped stitch from the first horizontal relief stitch you just made. You should have 14 loops on your hook. Finish the stitch like you did the previous relief stitch. In this case, you have just made 2 horizontal relief stitches around the same row of sc. Looping around the sc in the long horizontal stretch anchors the relief st to that row. In most cases, the last stitch that you pulled a loop through will be around a vertical post or a dtc relief cross. ** These long horizontal sts are always made from the left to the right. In a few cases, if you tried to make them from the right to the left, you would not have sts to loop around.
Here is how I stitch the first long horizontal row of the pattern:


Horizontal Relief Stitches. 1:(YO, insert the hook through a sc and pull up a loop) repeat for every other st. 2: Finish the st by pulling a loop through every 2 loop on the hook back to the beginning. 3: The 2nd horizontal relief is made in the same row of sc. 4: Completed double row of horizontal relief sts. 5: Stitch diagram.
In some rows, the second set of relief-dtc in a cross are made under the previous relief-dtc (for instance, in the second row of relief stitches).

In this case, YO 3 times, insert your hook underneath the first set of relief-dtc and around the tc-post below. Pull the post up enough to pull a loop around the stitch, like a front post stitch. Then proceed with the dtc like normal.


Relief-dtc made underneath the previous relief-dtc pair in a cross. Left: YO 3 times, insert the hook around the relief st below. Right: Pull the relief st up through the previous relief-dtc pair to work the rest of the st.

In the case of the second dtc cross in that row, the second set of relief-dtc are linked to a set of horizontal relief stitches.
Here, pull a free, working loop of yarn underneath the previous relief-dtc to use to stitch the horizontal relief stitches.
Update March 2017:
Many people have had difficulties in Row 13, the center where the knot turns a sharp corner and a horizontal row is created at the top of a relief stitch. Pay attention to where the bar is at the top of the stitch to indicate which stitches are connected together.

First, stitch the sc that are "hidden" behind the relief stitches.
These are the stitches that you will anchor the horizontal row onto in the next step. Do not stitch the diagonal dtc relief stitches (going down to the right) as they are connected to the horizontal row.

Second, stitch the horizontal row on top of those sc, anchored to them, and continue with the diagonal relief stitch anchored two rows below. Finish with the vertical fptc before completing the stitch. For the opposing right angle corner of the same row, start with the two vertical fptc as their own stitches. Then stitch sc across and finally the horizontal row (anchored around the sc and fptc just stitched) finishing with the diagonal relief stitches down to the left in one connected stitch.

The finished square before adding the border.
After the last row, chain 1 and work along the side adding a border of sc around with (sc, hdc, sc) in each corner.


Comments